
Get Started with AfterNow Prez
This is an overview of AfterNow Prez to just get you started in creating and giving your first presentation.
If you want a quick overview to see if AfterNow Prez Remote is right for you reach out to use and we will give you a quick 1/2hr demo.
Create your presentation on prez.afternow.io
Once you are logged in, you will see the option create new presentation. We designed the experience to look and feel a lot like PowerPoint or Keynote. In a similar manner, you can create slides, fill them with content, and add transitions. All you need to get started, is a recent web browser and a computer or tablet.
Adding text
To add text to your presentation, you can upload an image with a background that is black (for Hololens) or transparent (Hololens or Quest). But for the best performance, we recommend using our easy to use, built-in text tool.
Simply click on New text block and enter the text you want to display. You also have option to choose different fonts and adjust the formatting of your text. The text size can be controlled manually once you are in Edit mode (more on that later).
Uploading other content types
AfterNow Prez supports images, videos, audio files, and 3D objects. We generally refer to "Assets" when describing any type of slide content. To upload your first asset, click on the + icon and select upload files.
For optimal performance, we recommend the following guidelines:
images: under 1000x1000 pixels (photos from a modern cell phone are around: 4032x3024).
videos: FHD (full High Definition) at 1080p will work, but we suggest HD (standard High Definition) at 720p.
audio: mp3 or wav file format.
3D objects: GLB files under 20MB or Unity assetbundles. Aside from static 3D models, we also support embedded animations (e.g., a spinning globe).
For more information on how to upload 3D objects, please check out our article: Converting 3D models for AfterNow Prez.
Additional resource to add 3D models in your presentation:
- Where to find 3D models for AfterNow Prez
- Create 3D models with Virtual Reality
- Tutorial Create Unity Package
- Export GLB from iClone & CC3
Adding transitions
Once you have added some assets to a slide, they need transitions to make them appear in your presentation. By default, all new assets get an "On Command - Appear" transition assigned. To refine when and how your content shows up, select the target element look to the right of your view under Animation Settings. Here you can control the timeline for your slide.
By default, the asset will be set to Appear, which means the element just shows up at the designated moment. We encourage you to take some time to explore the another animation options. Aside from a range of Starting Animations, we also have Ending Animations that let you control when and how elements disappear again.
Another significant control option to explore, is whether you want the asset to appear "On Command" or "Automatically". On command means that progress will be halted until you perform an air tap command to trigger the transition. Whereas this manual action gives you full control of the pace of the presentation, some scenarios may benefit more from sequential transitions that occur automatically, possibly involving a "Delay Start" setting as well. We will take a deeper dive into all of these concepts later on.
To get started, all you need is an Appear animation for each of your assets; you can leave everything else by default for now. Once you get some hands-on experience, you will quickly get a feel for it!
Creating Slides
To keep you content clearly organized, it is recommended to break down your presentation into multiple slides. Click on the button New Slide to create an additional slide, then click on that new slide to start adding content to it.
Like the content transitions discussed earlier, the slides themselves also have transition settings; they are on the top-right block Animation Settings. Once again, you can stick with the default settings to get started.
If you wish to re-order your slides, simply drag and drop one of the slides thumbnails on in the left side column.
Organize presentation in VR/AR
Once you have followed the previous steps to create your slides, upload the assets and set up their transitions, the next step is to configure their placement in 3D space and test the presentation using the AN Prez App.
Installing AfterNow Prez
Quest
AfterNow Prez is available on the Quest through AppLab.
Follow this link:
https://www.oculus.com/experiences/quest/3434684843326642/
Click on the "Get" blue button. If you are not login it will ask you to login with Facebook and authorize Oculus aka MetaQuest.
Once the button display in dark blue with "Purchased" it means the app as been added to your app library in your Quest.
If you are using Oculus for Business contact us directly at today@afternow.io
Hololens
Look for AfterNow Prez directly from the Microsoft store in your Hololens.
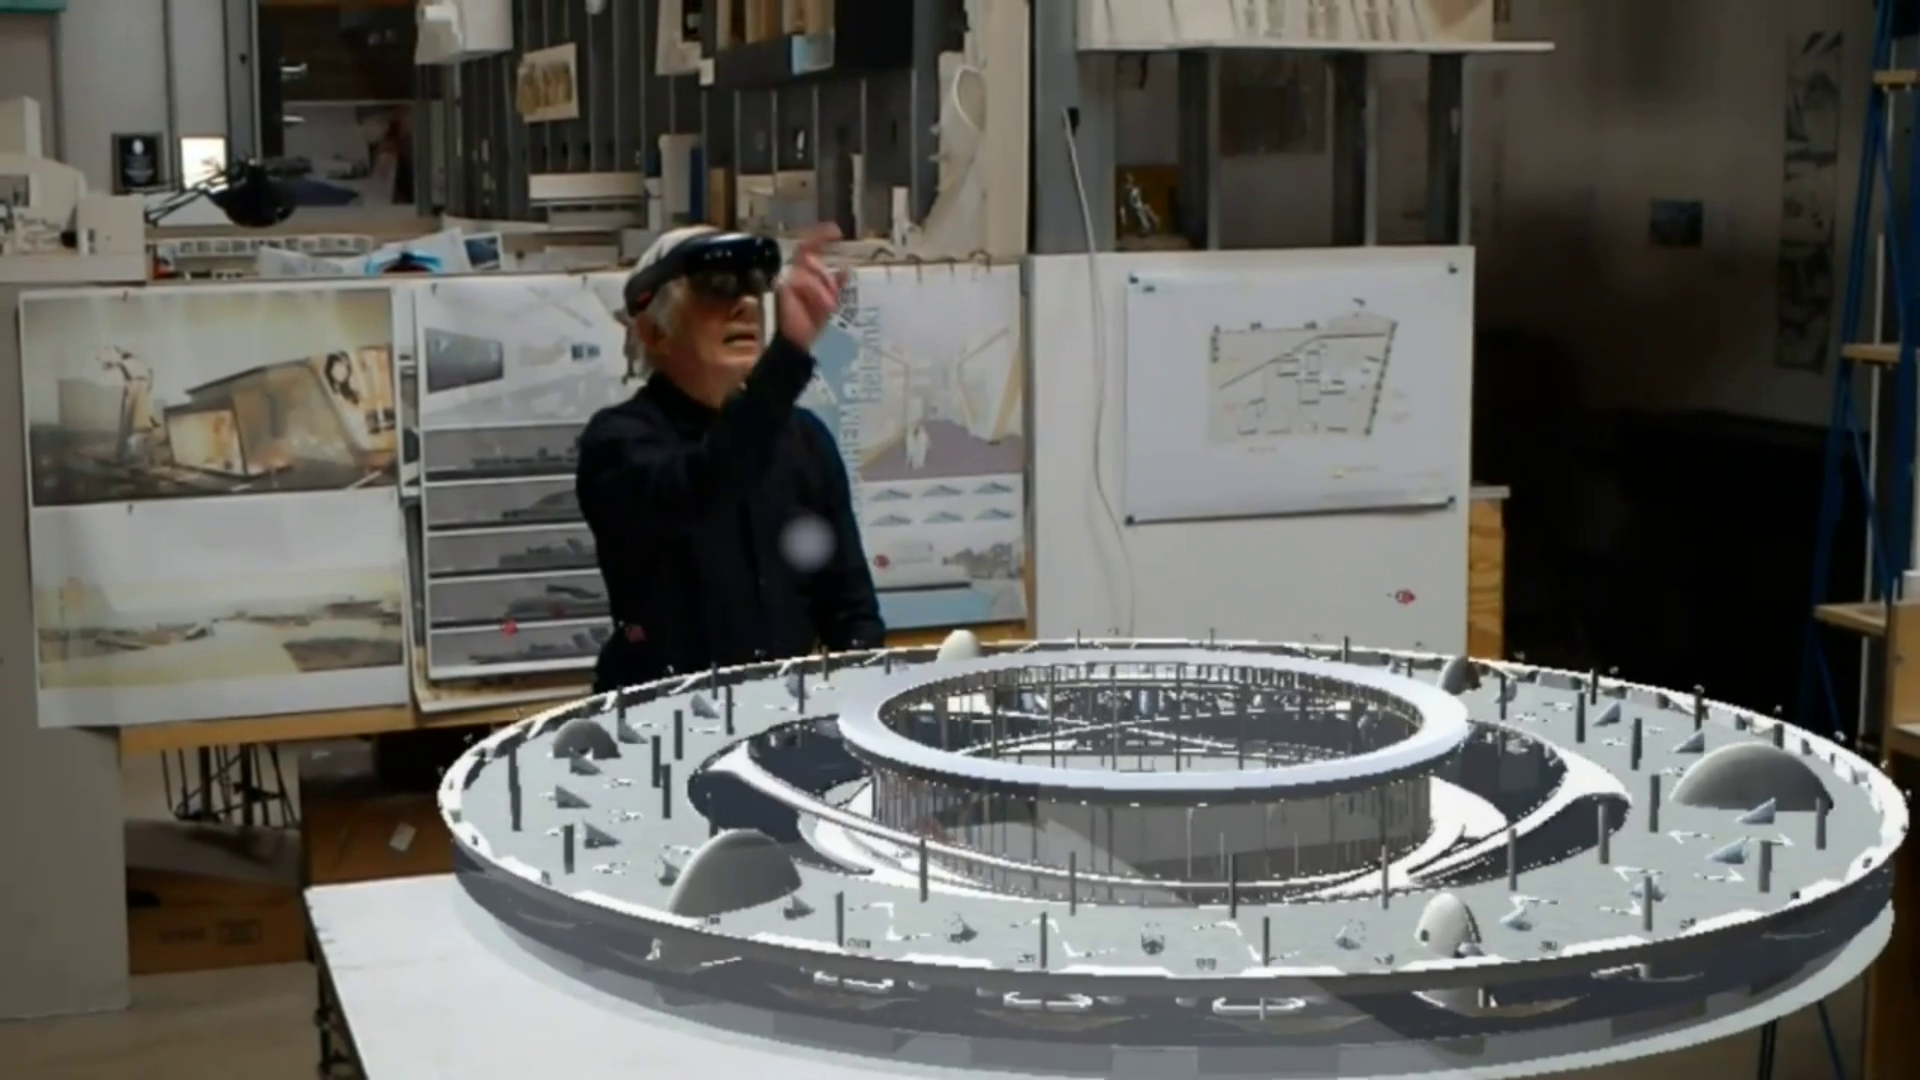
Positioning elements in 3D space
With AfterNow Prez installed on your device, please go ahead and start up the app. Log in with the same credentials you use in the Web Portal, then select your presentation in the list.
It will take a moment for the presentation to load. Simply wait until the blue, glowing bubble goes away > [this is Quest specific]. When the loading process is finished, you will see all your slide number listed in front of you. Simple select the one you want to update and the respective assets will appear in your view.
There are two different ways to manipulate the assets: one- or two-handed:
One-handed
Move - use one of your hands to air tap/pinch and grab the object, then let go once it is in the desired location.
Scale - put your hand near an object to notice the bounding box highlight, then use air tap/pinch on one of the corners of an asset's bounding box to resize the object.

Source: MRTK One-handed bounding box manipulation (link)
Rotate - using the same bounding box as shown above, look for the handles on the sides of the box and grab one of these to rotate the object in place. Note that 3D objects are locked in the upright position to prevent them from going off-axis. 2D objects such as text, images and videos can be rotated freely.
Two-handed
In this more advanced method, you can simply grab the object with both hands to move, rotate, and scale, all at the same time. This can save you time when performing a combination of actions, but it can result in unintended outcomes (e.g., you may accidentally resize an object, while you were only trying to move it).

Source: MRTK Two-handed manipulation (link)
Practice makes perfect
We recommend practicing both methods to get a feel for what works best depending on your goal. Notice how you can grab and manipulate objects from a distance too, using the pointers coming out of the palm of your hand/controller.

Source: MRTK Using pointers for far interaction (link)
Testing your presentation
When you are ready to start your presentation, open the menu, and click the Play button.
To open the menu on the Quest, move your palm up, and you should see a button by your hand, use your other hand to click on the button. If you are using the Quest controlers click on the X button to open and close the menu.
To open the menu on Hololens, perform an air tap gesture and hold it for 3 seconds.
You will then see a white rectangle and particles comming out of the location pad on the floor.
Walk into the location pad to start the presentation.
Sometime you need to move out of the location pad and get back in to trigger the presentation start.
To move to the next transition or next slide do a AirTap which is a quick pinch between your thumb and index. (see picture).

Invite others to join your presentation
Open the presentation you want to share on prez.afternow.io and take note of the Presentation ID at the top of the page. This is the 8-digid code you will use to invite others to your presentation. Clicking it will automatically copy it to your clipboard, so you can easily paste it into your email or calendar invitation.
Send that Presentation ID to everyone you want to invite to your presentation. Keep in mind that they also need to have a compatible AR/VR device with AfterNow Prez installed.
The best practice is to schedule a date and time for your meeting, and add the instructions on how to install AfterNow Prez to the calendar invite. You can also include your Presentation ID right away, or share it with them closer to the time of the meeting.
In the hours before the meeting
Before your meeting takes place, go to prez.afternow.io, and double-check if your presentation is locked. This will ensure the smoothest user experience for both you and your guests.
As the time of the meeting approaches, simply put on the headset, login into the AfterNow Prez app, and select your presentation from the list. It is recommended that the presenter shows up a few minutes early to greet guests as they arrive.
During the meeting
Because the presentation is locked, all users will skip Edit Mode and go directly into in Present mode. Once the presentation is done loading, you will see a white frame indicating where your content will show up, as well as the location pad on the floor.
To move to the next transition, perform an AirTap, a quick pinch between your thumb and index. (see the instruction GIF in Test your presentation).
To open the presenter menu:
Quest: move your palm up and press the button with your other hand. If you have the controllers, press the X or A button.
Hololens: AirTap and hold for 3+ seconds, and the menu will appear.
You can use the presenter menu to move forward or backward between the slides.
Troubleshoot and known issues
No known issues at this point.
Please send us any issue you may find.